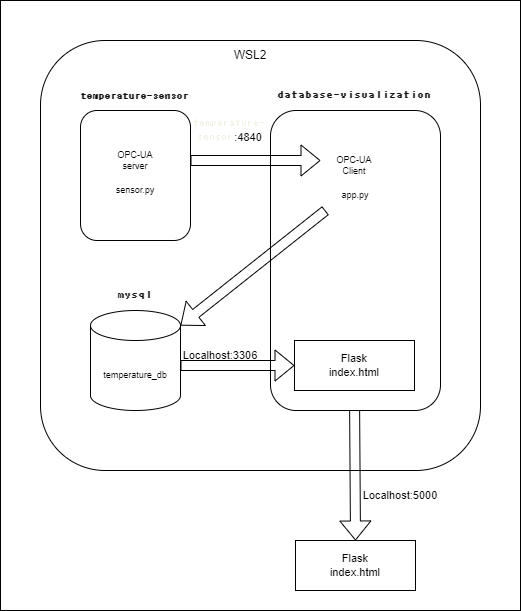
なにかと製造業で話題のOPCUAとDockerコンテナを使って温度データを収集し、それをデータベースに保存し、Webブラウザで簡単に可視化をする
全体構想

1:Docker Composeの設定
Docker Composeを使って複数のコンテナを設定します。1つは温度データを取得するためのコンテナ(temperature-sensor)、もう1つはデータベースと可視化のためのコンテナ(database-visualization)です。
Docker Composeファイル (docker-compose.yml)
version: '3'
services:
  temperature-sensor:
    build:
      context: .
      dockerfile: sensor.Dockerfile
    networks:
      - tempnet
  mysql:
    image: mysql:5.7
    environment:
      MYSQL_ROOT_PASSWORD: example
      MYSQL_DATABASE: temperature_db
    networks:
      - tempnet
    volumes:
      - mysql_data:/var/lib/mysql
  database-visualization:
    build:
      context: .
      dockerfile: visualization.Dockerfile
    depends_on:
      - mysql
    networks:
      - tempnet
    ports:
      - "5000:5000"

volumes:
  mysql_data:

networks:
  tempnet:
ステップ2:温度データ取得コンテナの設定
temperature-sensorコンテナは、ダミーの温度データを生成し、OPCUAサーバーを使って公開します。
Dockerfile (sensor.Dockerfile)
FROM python:3.9-slim

RUN pip install opcua

COPY sensor.py /app/sensor.py

CMD ["python", "/app/sensor.py"]
温度センサースクリプト (sensor.py)
from opcua import Server
import random
import time

server = Server()
server.set_endpoint("opc.tcp://0.0.0.0:4840/freeopcua/server/")
namespace = server.register_namespace("TemperatureSensorNamespace")

objects = server.get_objects_node()
temperature_obj = objects.add_object(namespace, "TemperatureSensor")
temperature = temperature_obj.add_variable(namespace, "Temperature", 0)

temperature.set_writable()

server.start()
print("OPCUA Server Started")

try:
    while True:
        temp = random.uniform(20.0, 25.0)
        print(f"New Temperature: {temp}")
        temperature.set_value(temp)
        time.sleep(2)
except KeyboardInterrupt:
    print("Server Stopped")
finally:
    server.stop()
ステップ3:データベースと可視化コンテナの設定
database-visualizationコンテナは、OPCUAクライアントを使って温度データを取得し、MySQLに保存し、Flaskを使って可視化します。
Dockerfile (visualization.Dockerfile)
FROM python:3.9-slim

RUN pip install opcua pymysql flask

COPY app.py /app/app.py
COPY templates /app/templates

CMD ["python", "/app/app.py"]
Flaskアプリケーション (app.py)
from opcua import Client
import pymysql
from flask import Flask, render_template
import threading
import time

client = Client("opc.tcp://temperature-sensor:4840/freeopcua/server/")

db = pymysql.connect(host="mysql", user="root", password="example", database="temperature_db")

app = Flask(__name__)

def fetch_temperature():
    while True:
        try:
            client.connect()
            temperature_node = client.get_node("ns=2;i=2")
            temperature = temperature_node.get_value()

            cursor = db.cursor()
            cursor.execute("INSERT INTO temperatures (value) VALUES (%s)", (temperature,))
            db.commit()
            print(f"Temperature {temperature} inserted into database")
        except Exception as e:
            print(f"Error: {e}")
        finally:
            client.disconnect()
        time.sleep(2)

@app.route('/')
def index():
    cursor = db.cursor()
    cursor.execute("SELECT value FROM temperatures ORDER BY timestamp DESC LIMIT 10")
    data = cursor.fetchall()
    return render_template('index.html', temperatures=data)

if __name__ == '__main__':
    threading.Thread(target=fetch_temperature).start()
    app.run(host='0.0.0.0', port=5000, debug=True)
HTMLテンプレート (templates/index.html)
<!DOCTYPE html>
<html lang="en">
<head>
    <meta charset="UTF-8">
    <title>Temperature Visualization</title>
</head>
<body>
    <h1>Latest Temperatures</h1>
    <ul>
        {% for temp in temperatures %}
        <li>{{ temp[0] }}</li>
        {% endfor %}
    </ul>
</body>
</html>
ステップ4:テーブルの作成
MySQLデータベース内に必要なテーブルを作成します。
MySQLコンテナに接続し、テーブルを作成
docker-compose up -d mysql

docker exec -it <mysql_container_id> mysql -u root -p
MySQLシェルで以下のコマンドを実行します:
USE temperature_db;

CREATE TABLE temperatures (
    id INT AUTO_INCREMENT PRIMARY KEY,
    value FLOAT NOT NULL,
    timestamp TIMESTAMP DEFAULT CURRENT_TIMESTAMP
);
ステップ5:コンテナの起動と可視化
docker-compose up --buildブラウザで以下のURLにアクセス:
http://localhost:5000

こんなかんじでブラウザに表示されたら無事に成功です!
おわりに
これで、温度データがリアルタイムで収集され、データベースに保存され、ブラウザで簡単に確認できるようになりました。Dockerを活用することで、環境のセットアップや管理が簡単になり、製造業の現場でもデータの可視化が手軽に行えるようになります。ぜひ、この記事を参考にして、データの可視化をしてみてください。


